> ## Documentation Index
> Fetch the complete documentation index at: https://docs.monostate.ai/llms.txt
> Use this file to discover all available pages before exploring further.
# 快速开始
> 在 10 分钟内训练您的第一个 AI 模型
# 您的第一个 AI 模型
让我们训练一个简单的文本分类模型,可以检测文本中的积极与消极情感。本教程大约需要 10 分钟,可在任何计算机上运行。
**AI Training 新手?** 查看 [交互式向导指南](/wizard/overview) 获取更详细的教程,包括如何选择模型、理解数据集大小和使用向导命令。
## 开始之前
确保您已[安装 AI Training](/foundations/installation)。您应该能够运行:
```bash theme={null}
aitraining --version
```
如果您还没有安装,最快的方法是:
```bash theme={null}
# 如果您没有 uv,请安装它
curl -LsSf https://astral.sh/uv/install.sh | sh # Mac/Linux
# 或
powershell -c "irm https://astral.sh/uv/install.ps1 | iex" # Windows
# 然后安装 AI Training
uv pip install aitraining torch torchvision torchaudio
```
## 选择您的路径
我们将以两种方式展示相同的任务。选择您熟悉的方式:
## 使用交互式向导
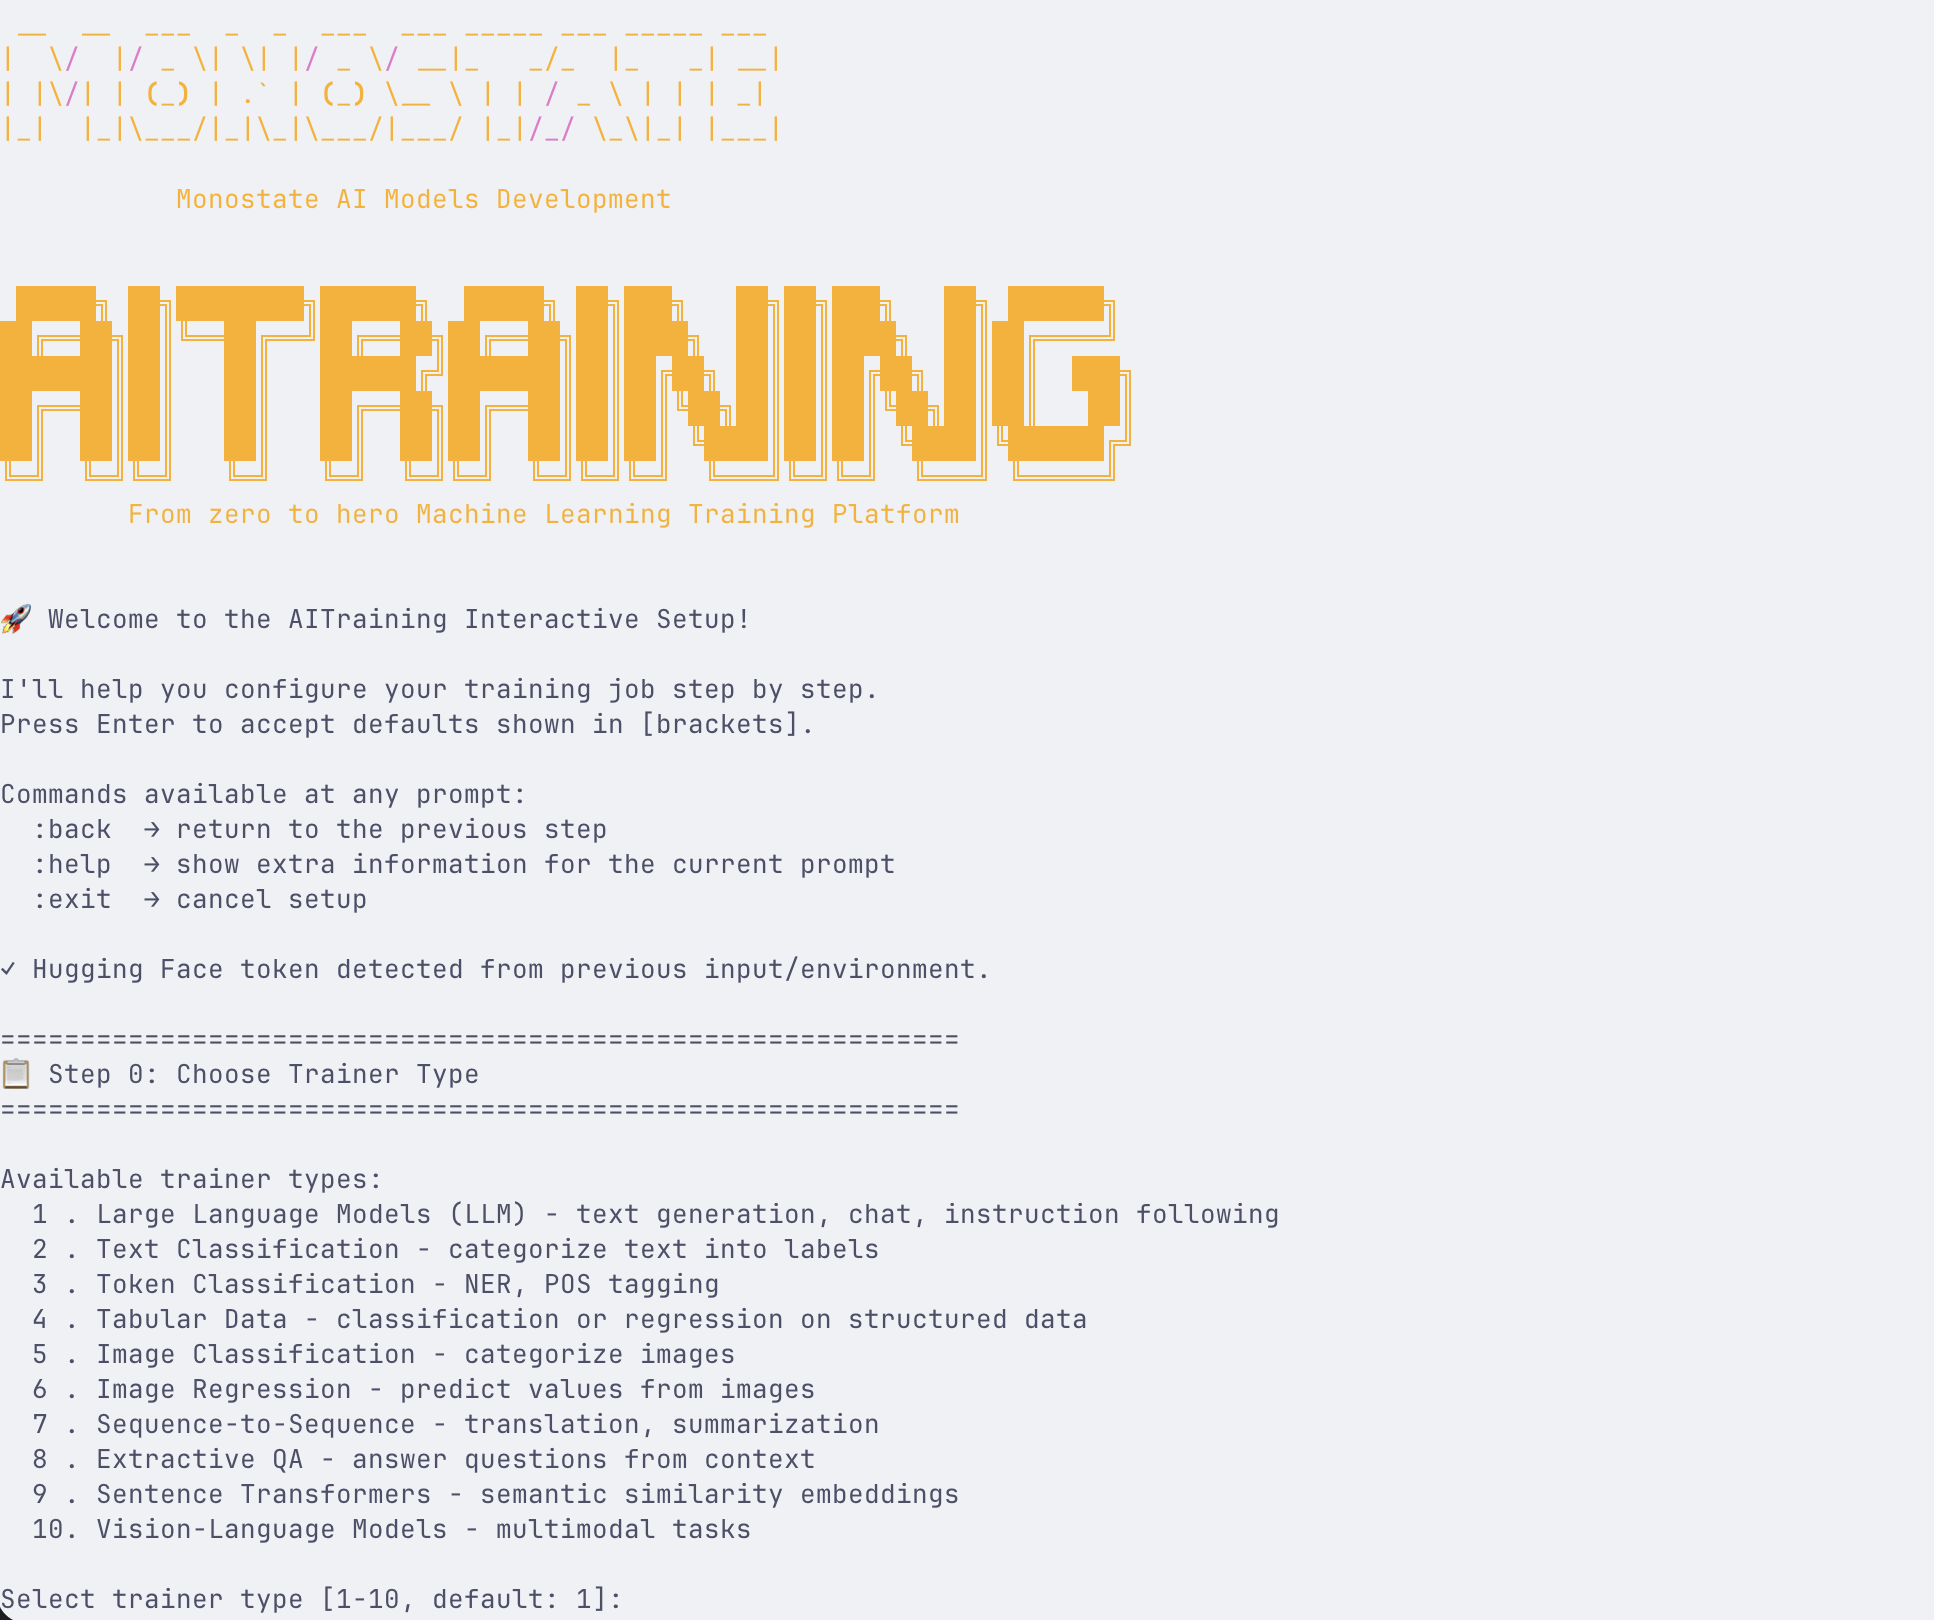 ### 1. 启动向导
打开您的终端并运行:
```bash theme={null}
aitraining
```
交互式向导将引导您完成配置。
### 2. 选择任务类型
从菜单中选择 **Text Classification**。
### 3. 准备您的数据
创建一个名为 `reviews.csv` 的简单 CSV 文件:
```csv theme={null}
text,label
"This product is amazing! Best purchase ever.",positive
"Terrible quality. Complete waste of money.",negative
"Great service and fast delivery.",positive
"Broken on arrival. Very disappointed.",negative
"Exceeded my expectations!",positive
"Would not recommend to anyone.",negative
```
### 4. 按照提示操作
向导将询问:
* **Data path**: 输入 `./reviews.csv`
* **Model**: 选择 `bert-base-uncased`(或从热门模型中选择)
* **Text column**: 输入 `text`
* **Label column**: 输入 `label`
* **Output directory**: 输入 `./my-sentiment-model`
**向导命令:**
* `:help` - 获取当前步骤的帮助
* `:back` - 返回上一步
* `:exit` - 取消并退出
* `:search ` - 搜索模型/数据集
* `:sort
## 使用 CLI
### 1. 准备您的数据
创建一个名为 `train.csv` 的文件:
```csv theme={null}
text,label
"This product is amazing! Best purchase ever.",positive
"Terrible quality. Complete waste of money.",negative
"Great service and fast delivery.",positive
"Broken on arrival. Very disappointed.",negative
"Exceeded my expectations!",positive
"Would not recommend to anyone.",negative
```
### 2. 训练模型
运行此命令:
```bash theme={null}
aitraining text-classification \
--model bert-base-uncased \
--data-path train.csv \
--text-column text \
--target-column label \
--output-dir ./my-sentiment-model \
--epochs 3
```
每个部分的含义:
* `text-classification`: 任务类型
* `--model`: 从哪个预训练模型开始
* `--data-path`: 您的训练数据文件
* `--text-column`: 哪一列包含文本
* `--target-column`: 哪一列包含标签
* `--output-dir`: 保存训练模型的位置
* `--epochs`: 训练轮数
### 3. 观察训练
您将看到如下输出:
```
Loading model bert-base-uncased...
Processing data...
Training started...
Epoch 1/3: loss=0.65, accuracy=0.67
Epoch 2/3: loss=0.42, accuracy=0.83
Epoch 3/3: loss=0.31, accuracy=0.92
Model saved to ./my-sentiment-model
```
### 4. 测试您的模型
```bash theme={null}
aitraining predict \
--model-path ./my-sentiment-model \
--text "This is absolutely fantastic!"
```
输出:
```
Prediction: positive (confidence: 0.94)
```
## 使用 Python
### 1. 创建 Python 脚本
创建一个名为 `train_sentiment.py` 的文件:
```python theme={null}
from aitraining import TextClassification
import pandas as pd
# Create training data
data = {
'text': [
"This product is amazing! Best purchase ever.",
"Terrible quality. Complete waste of money.",
"Great service and fast delivery.",
"Broken on arrival. Very disappointed.",
"Exceeded my expectations!",
"Would not recommend to anyone."
],
'label': [
'positive', 'negative', 'positive',
'negative', 'positive', 'negative'
]
}
# Save as CSV
df = pd.DataFrame(data)
df.to_csv('train.csv', index=False)
# Configure training
trainer = TextClassification(
model="bert-base-uncased",
data_path="train.csv",
text_column="text",
target_column="label",
output_dir="./my-sentiment-model",
epochs=3,
batch_size=8
)
# Start training
print("Starting training...")
trainer.train()
# Test the model
test_texts = [
"This is absolutely fantastic!",
"Complete waste of time and money."
]
predictions = trainer.predict(test_texts)
for text, pred in zip(test_texts, predictions):
print(f"Text: {text}")
print(f"Prediction: {pred['label']} (confidence: {pred['score']:.2f})\n")
```
### 2. 运行脚本
```bash theme={null}
python train_sentiment.py
```
### 3. 稍后使用您的模型
```python theme={null}
from aitraining import load_model
# Load your trained model
model = load_model("./my-sentiment-model")
# Make predictions
result = model.predict("Best product ever!")
print(result) # {'label': 'positive', 'score': 0.95}
```
## 发生了什么?
您已成功完成:
1. **准备数据** - 创建了供 AI 学习的示例
2. **配置训练** - 选择了模型和设置
3. **训练模型** - AI 从您的示例中学习了模式
4. **测试预测** - 验证了模型在新文本上的工作效果
5. **保存模型** - 可以随时使用而无需重新训练
## 理解结果
您的模型学会了:
* 识别积极词汇和短语
* 识别消极情感模式
* 对未见过的文本进行预测
仅用 6 个示例,您就得到了一个可用的模型。使用更多数据(数百或数千个示例),准确性会显著提高。
## 常见下一步
更多示例 = 更好的准确性。尝试为每个类别添加 50-100 个示例。
尝试不同的基础模型,如 `distilbert-base-uncased`(更快)或 `roberta-base`(更准确)。
调整 epochs、learning rate 和 batch size 以获得更好的结果。
了解如何将模型作为 API 提供服务或将其集成到应用程序中。
## 尝试其他任务
现在您了解了基础知识,试试这些:
* **Language Generation** - 使用对话示例训练聊天机器人
* **Image Classification** - 将图像分类到类别中
* **Named Entity Recognition** - 从文本中提取姓名、地点、日期
* **Translation** - 在语言之间转换
## 故障排除
* 将 batch size 减少到 4 或 2
* 使用较小的模型,如 `distilbert`
* 确保使用 GPU(如果可用)
* 添加更多训练示例
* 确保标签一致
* 尝试训练更多 epochs
* 检查您的数据是否平衡
* 减少 batch size
* 使用较小的模型
* 启用 gradient checkpointing
* 使用 LoRA 进行高效训练
## 下一步是什么?
* **[了解 AI Training](/foundations/understanding-ai-training)** - 了解训练如何工作
* **[选择您的界面](/foundations/choosing-interface)** - UI、CLI 和 API 的详细比较
* **[模型类型](/foundations/model-types)** - 探索不同的模型架构
* **[高级技术](/advanced/prompt-distillation)** - 了解 DPO、ORPO 等
***
**专业提示**:从交互式向导(`aitraining`)开始以理解概念,然后转向 CLI 进行自动化,并使用 Chat 界面(`aitraining chat`)测试您的模型。
### 1. 启动向导
打开您的终端并运行:
```bash theme={null}
aitraining
```
交互式向导将引导您完成配置。
### 2. 选择任务类型
从菜单中选择 **Text Classification**。
### 3. 准备您的数据
创建一个名为 `reviews.csv` 的简单 CSV 文件:
```csv theme={null}
text,label
"This product is amazing! Best purchase ever.",positive
"Terrible quality. Complete waste of money.",negative
"Great service and fast delivery.",positive
"Broken on arrival. Very disappointed.",negative
"Exceeded my expectations!",positive
"Would not recommend to anyone.",negative
```
### 4. 按照提示操作
向导将询问:
* **Data path**: 输入 `./reviews.csv`
* **Model**: 选择 `bert-base-uncased`(或从热门模型中选择)
* **Text column**: 输入 `text`
* **Label column**: 输入 `label`
* **Output directory**: 输入 `./my-sentiment-model`
**向导命令:**
* `:help` - 获取当前步骤的帮助
* `:back` - 返回上一步
* `:exit` - 取消并退出
* `:search ` - 搜索模型/数据集
* `:sort
## 使用 CLI
### 1. 准备您的数据
创建一个名为 `train.csv` 的文件:
```csv theme={null}
text,label
"This product is amazing! Best purchase ever.",positive
"Terrible quality. Complete waste of money.",negative
"Great service and fast delivery.",positive
"Broken on arrival. Very disappointed.",negative
"Exceeded my expectations!",positive
"Would not recommend to anyone.",negative
```
### 2. 训练模型
运行此命令:
```bash theme={null}
aitraining text-classification \
--model bert-base-uncased \
--data-path train.csv \
--text-column text \
--target-column label \
--output-dir ./my-sentiment-model \
--epochs 3
```
每个部分的含义:
* `text-classification`: 任务类型
* `--model`: 从哪个预训练模型开始
* `--data-path`: 您的训练数据文件
* `--text-column`: 哪一列包含文本
* `--target-column`: 哪一列包含标签
* `--output-dir`: 保存训练模型的位置
* `--epochs`: 训练轮数
### 3. 观察训练
您将看到如下输出:
```
Loading model bert-base-uncased...
Processing data...
Training started...
Epoch 1/3: loss=0.65, accuracy=0.67
Epoch 2/3: loss=0.42, accuracy=0.83
Epoch 3/3: loss=0.31, accuracy=0.92
Model saved to ./my-sentiment-model
```
### 4. 测试您的模型
```bash theme={null}
aitraining predict \
--model-path ./my-sentiment-model \
--text "This is absolutely fantastic!"
```
输出:
```
Prediction: positive (confidence: 0.94)
```
## 使用 Python
### 1. 创建 Python 脚本
创建一个名为 `train_sentiment.py` 的文件:
```python theme={null}
from aitraining import TextClassification
import pandas as pd
# Create training data
data = {
'text': [
"This product is amazing! Best purchase ever.",
"Terrible quality. Complete waste of money.",
"Great service and fast delivery.",
"Broken on arrival. Very disappointed.",
"Exceeded my expectations!",
"Would not recommend to anyone."
],
'label': [
'positive', 'negative', 'positive',
'negative', 'positive', 'negative'
]
}
# Save as CSV
df = pd.DataFrame(data)
df.to_csv('train.csv', index=False)
# Configure training
trainer = TextClassification(
model="bert-base-uncased",
data_path="train.csv",
text_column="text",
target_column="label",
output_dir="./my-sentiment-model",
epochs=3,
batch_size=8
)
# Start training
print("Starting training...")
trainer.train()
# Test the model
test_texts = [
"This is absolutely fantastic!",
"Complete waste of time and money."
]
predictions = trainer.predict(test_texts)
for text, pred in zip(test_texts, predictions):
print(f"Text: {text}")
print(f"Prediction: {pred['label']} (confidence: {pred['score']:.2f})\n")
```
### 2. 运行脚本
```bash theme={null}
python train_sentiment.py
```
### 3. 稍后使用您的模型
```python theme={null}
from aitraining import load_model
# Load your trained model
model = load_model("./my-sentiment-model")
# Make predictions
result = model.predict("Best product ever!")
print(result) # {'label': 'positive', 'score': 0.95}
```
## 发生了什么?
您已成功完成:
1. **准备数据** - 创建了供 AI 学习的示例
2. **配置训练** - 选择了模型和设置
3. **训练模型** - AI 从您的示例中学习了模式
4. **测试预测** - 验证了模型在新文本上的工作效果
5. **保存模型** - 可以随时使用而无需重新训练
## 理解结果
您的模型学会了:
* 识别积极词汇和短语
* 识别消极情感模式
* 对未见过的文本进行预测
仅用 6 个示例,您就得到了一个可用的模型。使用更多数据(数百或数千个示例),准确性会显著提高。
## 常见下一步
更多示例 = 更好的准确性。尝试为每个类别添加 50-100 个示例。
尝试不同的基础模型,如 `distilbert-base-uncased`(更快)或 `roberta-base`(更准确)。
调整 epochs、learning rate 和 batch size 以获得更好的结果。
了解如何将模型作为 API 提供服务或将其集成到应用程序中。
## 尝试其他任务
现在您了解了基础知识,试试这些:
* **Language Generation** - 使用对话示例训练聊天机器人
* **Image Classification** - 将图像分类到类别中
* **Named Entity Recognition** - 从文本中提取姓名、地点、日期
* **Translation** - 在语言之间转换
## 故障排除
* 将 batch size 减少到 4 或 2
* 使用较小的模型,如 `distilbert`
* 确保使用 GPU(如果可用)
* 添加更多训练示例
* 确保标签一致
* 尝试训练更多 epochs
* 检查您的数据是否平衡
* 减少 batch size
* 使用较小的模型
* 启用 gradient checkpointing
* 使用 LoRA 进行高效训练
## 下一步是什么?
* **[了解 AI Training](/foundations/understanding-ai-training)** - 了解训练如何工作
* **[选择您的界面](/foundations/choosing-interface)** - UI、CLI 和 API 的详细比较
* **[模型类型](/foundations/model-types)** - 探索不同的模型架构
* **[高级技术](/advanced/prompt-distillation)** - 了解 DPO、ORPO 等
***
**专业提示**:从交互式向导(`aitraining`)开始以理解概念,然后转向 CLI 进行自动化,并使用 Chat 界面(`aitraining chat`)测试您的模型。